Hwre's the thrird main plan that I have shared with your all.
I am still planning it to be built in stages. From the lowest to hightest level the railway will gradually grow. Passing loops will form the basis for the stations. Tempory reverse loops will mark the railhead.
This plan is simpler than the last two, but still the double decker with reverse loop staging loop at each end.
I tried different ideas, but they didn't work. Having a length of train (10ft) and the minimum radius of 30 inches (36 preferablly) mean you can only do so much.
The old plans had over 7 stations. This plan has 5. The branch is simpler, and the main station is now located on the upper deck just before the trip up to the upper staging.There is one helix, now located in the sun room opposite the sliding door.
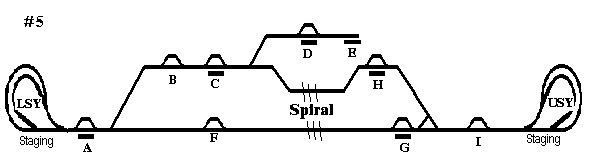
- A - medium junction station.
- B - Passing loop.
- C - small 3 track station before a junction to the branch.
- D - Branch Terminus.
- E - Wharf.
- F - Passing loop.
- G - Main station. It is a junction with a triangle, on one leg is the station that comes up from the helix. The next leg heads up to the upper staging and through a container terminal. The final leg is the other mianline from "G".
- H - Medium station with lots of passenger potential.
- I - Passing loop.
Another depature is the use of a extensive duckunder on the upper level that takes a station across the sun room. The lower deck has a wharf, the upper is a through station. I have decided this is semi mushroom style, the lower is operated from the windows side, the upper station is operated from the wall side- with a small platform, as it is high to allow a nod under with normal aisle movement.
I still have my branch, the twin routes to the upper deck. This time I have not bothered to draw in extension to the garage as that can wait for that eventuality.
There are a few downfalls in this plan. When I drew the lower deck, at first I put it aside to draw another. The reason for that was using the former toilet area as a passageway. Height constraints may hamper easy flow, not to mention head-ceiling contact ! On returning home I went straight down there to see how the height really affect. It seem okay, but is is close.
Another downfall is the amount of track tranversing one scene. It is probally more than I would like, but allows far more to be included. This mainly applies to the lower deck.
 Contruction:
- It will start with the lower staging as far as "A".
- The line to "C" would be built.
- The branch to "D" would be built.
- The track to "F" - a tempory reverse loop would be built here
- The spiral would be started up to "G" & "H"
- From "G" to the upper staging via "I" will be built
- The line from "G" to "H" built.
- The line from the spiral to "H" built.
| These plans are "artist's impressions" of the actual plan. They are not scale. I still use paper, pen and a weird colour legend for my plans, so these plans were shot with a digital camera, ported into Paint Shop Pro 3 & 5 and drawn on etc. So they are not scale ! |
 Plan description.
The lower staging is now located in the main room, under Station "C". It comes out of a tunnel portal and climbs upto station "A".
Station "A" is based loosely on Murranbilla in idea, no longer resembling that station. It is a Junction station.
The mainline curves off and heads back alongside the track, through Passing Loop "B" on a grade up and into station "C". Station "C" is a smaller three track station with some extra sidings. While train can pass here ,normally it is used to reverse trains off the branch. That junction is around the corner as the line still rises slightly.
The mainline ducks into the helix, with the branch dropping under as it emerges under the helix in the sun room.
The branch terminus offers plenty of activity and industrial shunting. The station has a wharf that extends into the sun room middle as a narrow peninsular. There is other industries to keep a shunter happy all day.

Returnig back to "A" the 'secondary' mainline heads around the peninsular, and along the wall, through the wall into the sunroom and rises above the branch station below, through passing loop "F". The line then curves around and enters the helix.
The helix bring both lines upto the upper level. The mainline curves out of the helix and into the Station "G" that is above the Wharf "E" on the lower deck. This is the major station on the line and has a decent loco area. But no tuttable here as the triangle is used for that purpose. The triangle at the driveway end heads into the wall, towards "H" - and around the room above "D", through the container terminal. This gives the station operator more shunting if they want. Or it alows another person to operate that "outer" yard.

From the container terminal the line goes through the wall into the main room where it negotiates a passing loop "I" before it's climb back into the sun room via the doorway - at this point it is right at the doorways's top.
The secondary mainline exits the helix a full turn before the mainline does, heads through the wall and climbs into station "H". This is a busy station with extra platforms and modest yards.
The line leaves "H", goes around the peninsular climbing untill it enter the wall and into "G".
